Saturday, January 9, 2021

Easily managing your build environments

Have you come across situations where your build tools suddenly stop working after you update the operating system? Do you want a simple way of setting up your build environment each time you change or format your machine?


One option is to use Docker-based build environments. In this approach, you can create Docker images with the necessary build tools and dependencies. However, you will still have to remember the tags, mount your source code manually, and execute docker commands with multiple arguments each time. This approach is right but needs some effort.


To address the issues in the approach mentioned above, The Condo [1] was developed. The Condo is a simple bash script that wraps all the necessary docker commands you need to manage your build environments.


You can install condo by running the following command


/bin/bash -c "$(curl -fsSL https://raw.githubusercontent.com/jsdjayanga/condo/main/scripts/install.sh)"


Following are four simple commands that the Condo supports.


List build environments

    condo list

Run a build environment. condo <build-env-name>

    condo devj11

Stop a build environment. condo stop <build-env-name>

  condo stop devj11

Clean a build environment. condo clean <build-env-name>

  condo clean devj11


The configuration file (~/.condo/condo.json) allows to store all the necessary information to run the respective Docker images hence allowing you to run the docker image with just the name of the environment.

You can configure and add as many as build environment you like, e.g., java, golang, spring, or any custom docker image of your choice. Furthermore, the "additional-arguments" section in the configuration allows you to provide any docker compliant arguments to your docker image.

Try the Condo your self share your experience!

[1] https://github.com/jsdjayanga/condo

Thursday, January 17, 2019

Building your own JDK distributions

Everyone started to talk about openJDK[1] with the new licensing that Oracle introduced in January 2019. According to Oracle[2] public updates for Java SE8[3] will be available until the end of 2020 for individual personal use but not for business, commercial or production use[4].

 This lead people to look into alternative JDK distributions. AdoptOpenJDK[5] and AWS Corretto [6] seems to be good options. However, by the time this post is written, AWS Corretto still in its preview state.

By the way, the aim of this post is not to talk about other OpenJDK distributions but to build your JDK distribution.

Let's get our hands dirty.
Hmmmmm, no, you don't have to get your hands dirty. I have made it super simple for you :). I have made a docker image[7] which contains all the necessary dependent tools and libraries. Just follow the below mantioned steps and you will have your own OpenJDK distribution.

Note: Install Docker[1], if you haven't done it yet.

1. Pull the docker image

docker pull jsdjayanga/ubuntu-openjdk8-build

2. Spin up a container with the above image

docker run -it jsdjayanga/ubuntu-openjdk8-build

3. Go to source the directory

cd jdk8u

4. Checkout the tag

hg checkout jdk8u192-b12

5. Run the configure. You can set your name as the release user if you wish by setting --with-user-release-suffix

bash configure --enable-unlimited-crypto --with-user-release-suffix=jsdjayanga --with-build-number=b01 --with-milestone=192

6. Create images

make images

This process would take 30min to 1h and finally, you have your own OpenJDK distribution in the following location.

/jdk8u/build/linux-x86_64-normal-server-release/images

Try this is out and share your experience :)


[1] https://openjdk.java.net/
[2] https://www.oracle.com/index.html
[3] https://www.oracle.com/technetwork/java/javase/downloads/jdk8-downloads-2133151.html 
[4] https://java.com/en/download/release_notice.jsp
[5] https://adoptopenjdk.net/
[6] https://aws.amazon.com/corretto/
[7] https://hub.docker.com/r/jsdjayanga/ubuntu-openjdk8-build

Sunday, August 5, 2018

WUM3 New Features

WSO2 had been looking into the possibilities of improving the Update delivery mechanism for several years. As a result, WSO2 Update Manager (WUM) [1], a groundbreaking tool which enables shipping updates proactively, was developed two years ago. The latest version, WUM 3.0, was released two weeks back in parallel to the WSO2 US Con [4].  This article will discuss the new features of the WUM 3.0.

The novelty begins with the auto-migration mechanism. Your migration experience from WUM 2.0 to WUM 3.0 is seamless. At the very first run of the WUM 3.0, it will automatically detect the previous WUM installation ("Older WUM home(/Users/<yourname>/.wum-wso2) detected.") and ask whether you want to migrate. If you select "yes" a new WUM home will be created at "/Users/<yourname>/.wum3" with all your previous product packs and updated packs. However, you have the flexibility of starting off with a fresh WUM home by selecting "no" if you don't want to continue with the previous packs.

Next, the most awaited feature for WUM, WUM Channels. A channel is nothing but a mechanism to deliver a filtered set of updates. As an initiative, we released two channels.

  • Channel "full": this channel delivers all the fixes, including bug fixes, security fixes, improvements, etc.
This channel is preferred by many, who are managing dynamic requirements and continuous development. As this channel delivers various types of updates, it helps to stabilize the system in a highly evolving environment by proactively providing fixes. 

  • Channel "security": this channel only delivers security fixes.
As opposed to the channel "full" the channel "security" provides only the security updates. This channel will help the users with static requirements who infrequently push changes to the production environment. As the production system is stable and seldom changed, channel "security" helps to push only security fixes into the production system.

Another new feature is to create WUM updated packs using a timestamp. This feature was initially developed to help WSO2 support, in building a WUM updated product pack to a specific timestamp given by WSO2 clients. However, we decided to expose this feature to all WUM users as this would be useful to create a WUM updated pack (to particular timestamp) in case you accidentally delete an updated pack form WUM home.

Try new WUM 3.0 [2] and WSO2 products. Subscribe for Free Trial Subscription [3] to get access to WSO2 updates and all benefits of a WSO2 Subscription.

[1] https://docs.wso2.com/display/WUM300/Introduction
[2] https://wso2.com/updates/wum
[3] https://wso2.com/subscription
[4] https://us18.wso2con.com/

Tuesday, January 24, 2017

How to increase max connection in MySql

When you try to make a large number of connections to the MySQL server, sometimes you might get the following error.

com.mysql.jdbc.exceptions.jdbc4.MySQLNonTransientConnectionException: Data source rejected establishment of connection,  message from server: "Too many connections"

There are two values governing the max number of connections one can create

  1. max_user_connections
  2. global.max_connections

1. max_user_connections

The max_user_connections is a user level parameter which you can set for each user. To let a user to create any number of connections set the above mentioned value to zero '0'.

First view the current  max_user_connections:

SELECT max_user_connections FROM mysql.user WHERE user='my_user' AND host='localhost';

Then set it to zero


GRANT USAGE ON *.* TO my_user@localhost MAX_USER_CONNECTIONS 0;

2. global.max_connections

The global.max_connections is a global parameter and has the precedence over 
max_user_connections. Hence just increasing the max_user_connections is not enough. Hence you have to increase the max_user_connections as well.


set @@global.max_connections = 1500;


Reference:

[1] http://dba.stackexchange.com/questions/47131/how-to-get-rid-of-maximum-user-connections-error

[2] https://www.netadmintools.com/art573.html

Friday, January 20, 2017

Installing and Configuring NGINX in ubuntu (for a Simple Setup)

In this post I am going to present you, how to install NGINX and setup it to operate with simple HTTP routing.

Below are the two easy steps to install NGINX in your ubuntu system.


sudo apt-get update
sudo apt-get install nginx

Once you are done go to any web browser and type in "http://localhost", in case  you are installing in the local machine or "http://[IP_ADDRESS]"

This will show you the default HTTP page hosted by NGINX


Welcome to nginx!

If you see this page, the nginx web server is successfully installed and working. Further configuration is required.

For online documentation and support please refer to nginx.org.
Commercial support is available at nginx.com.

Thank you for using nginx.

Below are few easy commands to "Stop", "Start" or "Restart"


sudo service nginx stop
sudo service nginx start
sudo service nginx restart


By now you have NGINX installed, up and running on your system.

We will next we how to configure NGINX to listen to a particular port and route the traffic to some other end points.

Below is a sample configuration file you need to create. Let's first see what each of these configuration means.

"upstream" : represents a group of endpoints that you need to route you requests.

"upstream/server" : an endpoint that you need to route you requests.

"server" : represent the configurations for listing ports and routing locations

"server/listen" : this is the port that NGINX will listen to

"server/server_name" : the server name this machine (where you install the NGINX)

"server/location/proxy_pass" : the group name of the back end servers you need to route your requests to. 


upstream backends {
    server 192.168.58.118:8280;
    server 192.168.88.118:8280;
}

server {
    listen 8280;
    server_name 192.168.58.123;
    location / {
        proxy_pass http://backends;
    }
}

The above configuration instructs NGINX to route requests that is coming into "192.168.58.123:8280", to be routed into "192.168.58.118:8280" or "192.168.88.119:8280" in round robin manner.

1. To make that happen you have to create a file with above configuration at "/etc/nginx/sites-available/mysite1". You can use any name you want. In this example I named it as "mysite1".

2. Now you have to enable this configuration by creating a symbolic link to the above file in "/etc/nginx/sites-enabled/" location
/etc/nginx/sites-enabled/mysite1 -> /etc/nginx/sites-available/mysite1

3. Now the last step. You have to restart the NGINX to get the new configurations affected.

Once restarted, any request you send to "192.168.58.123:8280" will be load balanced in to "192.168.58.118:8280" or "192.168.88.119:8280" in round robin manner.

Hope this helps you to quickly setup NGINX for you simple routing requirements

Friday, May 27, 2016

Deploying artifacts to WSO2 Servers using Admin Services

In this post I am going to show you, how to deploy artifacts on WSO2 Enterprise Service Bus [1] and WSO2 Business Process Server [2] using Admin Services [3]

Usual practice with WSO2 artifacts deployment is to, enable DepSync [4] (Deployement Synchronization). And upload the artifacts via the management console of master node. Which will then upload the artifacts to the configured SVN repository and notify the worker nodes regarding this new artifact via a cluster message. Worker nodes then download the new artifacts from the SVN repository and apply those.

In this approach you have to log in to the management console and do the artifacts deployment manually.

With the increasing use of continuous integration tools, people are looking in to the possibility of automating this task. There is a simple solution in which you need to configure a remote file copy to the relevant directory inside the [WSO2_SERVER_HOME]/repository/deployment/server directory. But this is a very low level solution.

Following is how to use Admin Services to do the same in much easier and much manageable manner.

NOTE: Usually all WSO2 servers accept deployable as .car file but WSO2 BPS prefer .zip for deploying BPELs.

For ESB,
  1. Call 'deleteApplication' in ApplicationAdmin service and delete the
    application existing application
  2. Wait for 1 min.
  3. Call 'uploadApp' in CarbonAppUploader service
  4. Wait for 1 min.
  5. Call 'getAppData' in ApplicationAdmin, if it returns application data
    continue. Else break
 For BPS,
  1. Call the 'listDeployedPackagesPaginated' in
    BPELPackageManagementService with page=0 and
    packageSearchString=”Name_”
  2. Save the information
    <ns1:version>
    <ns1:name>HelloWorld2‐1</ns1:name>
    <ns1:isLatest>true</ns1:isLatest>
    <ns1:processes/>
    </ns1:version>
  3. Use the 'uploadService' in BPELUploader, to upload the new BPEL zip
    file
  4. Again call the 'listDeployedPackagesPaginated' in
    BPELPackageManagementService with 15 seconds intervals for 3mins.
  5. If it finds the name getting changed (due to version upgrade. Eg:
    HelloWorld2‐4), then continue. (Deployment is success)
  6. If the name doesn't change for 3mins, break. Deployment has some
    issues. Hence need human intervention

[1] http://wso2.com/products/enterprise-service-bus/
[2] http://wso2.com/products/business-process-server/
[3] https://docs.wso2.com/display/BPS320/Calling+Admin+Services+from+Apps
[4] https://docs.wso2.com/display/CLUSTER420/SVN-Based+Deployment+Synchronizer

Sunday, March 6, 2016

How to write OSGi tests for C5 compoments

WSO2 C5 Carbon Kernel will be the heart of all the next generation Carbon products. With Kernel version 5.0.0 we introduced PAX OSGi testing.

Now we are trying to ease the life of C5 components developers by providing a utility, which will take care of most of the generic configurations need in OSGi testing. This will enable the C5 component developer to just specify a small number of dependencies and start writing PAX tests for C5 components.

You will have to depend on the following library, except for other PAX dependencies


1
2
3
4
5
6
<dependency>
    <groupId>org.wso2.carbon</groupId>
    <artifactId>carbon-kernel-osgi-test-util</artifactId>
    <version>5.1.0-SNAPSHOT</version>
    <scope>test</scope>
</dependency>


You can find a working sample on the following Git repo
https://github.com/jsdjayanga/c5-sample-osgi-test

Above will load the dependencies you need by default to test Carbon Kernel functionalities. But as a component developer you will have to specify your components jars into the testing environment. This is done via @Configuration annotation in your test class.

Lets assume you work on a bundle org.wso2.carbon.jndi:org.wso2.carbon.jndi, below is how you should specify your dependencies.


 1
 2
 3
 4
 5
 6
 7
 8
 9
10
    @Configuration
    public Option[] createConfiguration() {
        List<Option> customOptions = new ArrayList<>();
        customOptions.add(mavenBundle().artifactId("org.wso2.carbon.jndi").groupId("org.wso2.carbon.jndi")
                .versionAsInProject());

        CarbonOSGiTestEnvConfigs configs = new CarbonOSGiTestEnvConfigs();
        configs.setCarbonHome("/home/jayanga/WSO2/Training/TestUser/target/carbon-home");
        return CarbonOSGiTestUtils.getAllPaxOptions(configs, customOptions);
    }


Once these are done, your test should ideally work :)

Friday, December 25, 2015

How to create a heap dump of your Java application

Heap in a JVM, is the place where it keeps all your runtime objects. The JVM create a dedicated space for the heap at the JVM startup, which can be controlled via JVM option -Xms<size> eg: -Xms100m (this will allocate 100MBs for the heap). JVM is capable of increasing and decreasing the size of the heap [1] based on the demand, and JVM has another option which allows to set max size for the heap, -Xmx<size>, eg: -Xmx6g (this allows the heap to grow up to 6GBs)

JVM automatically perform Garbage Collection (GC), when it detects its about to reach the heap size limits. But the GC can only clean the objects which are eligible for GC. If the JVM can't allocate required memory even after GC, JVM will crash with "Exception in thread "main" java.lang.OutOfMemoryError: Java heap space"

If your Java application in production crashes due to some issue like this, you cant just ignore the incident, and restart your application. You have to analyze the what cause the JVM crash, and take the necessary actions to avoid it happening again. This is where the JVM heap dump comes in to the play.

JVM heap dumps are by default disabled, you have to enable heap dumps explicitly by providing following JVM option, -XX:+HeapDumpOnOutOfMemoryError

The below sample code, tries to create a multiple, large arrays of chars, and keep the references in list. Which cause those large arrays ineligible for garbage collection.

package com.test;

import java.util.ArrayList;
import java.util.List;

public class TestClass {
    public static void main(String[] args) {
        List<Object> list = new ArrayList<Object>();
        for (int i = 0; i < 1000; i++) {
            list.add(new char[1000000]);
        }
    }
}

If you run the above code with following command lines,

1. java -XX:+HeapDumpOnOutOfMemoryError -Xms10m -Xmx3g com.test.TestClass

Result: Program runs and exit without any error. The heap size starts from 10MB and then grows as needed. Above needs memory less than 3GB. So, it completes without any error.

2. java -XX:+HeapDumpOnOutOfMemoryError -Xms10m -Xmx1g com.test.TestClass

Result: JVM crashes with OOM.

If we change the above code a bit to remove the char array from the list, after adding to the list. what would be the result


package com.test;

import java.util.ArrayList;
import java.util.List;

public class TestClass {
    public static void main(String[] args) {
        List<Object> list = new ArrayList<Object>();
        for (int i = 0; i < 1000; i++) {
            list.add(new char[1000000]);
            list.remove(0);
        }
    }
}

3. java -XX:+HeapDumpOnOutOfMemoryError -Xms10m -Xmx10m com.test.TestClass

Result: This code runs without any issue even with a heap of 10MBs.

NOTE:
1. There is no impact to your application if you enable the heap dump in the JVM. So, it is better to always enable -XX:+HeapDumpOnOutOfMemoryError in your applications

2. You can create a heap dump of a running Java application with the use of jmap. jmap come with the JDK. Creating a heap dump of a running application cause the application to halt everything for a while. So, not recommended to use in production system. (unless there is a extreme situation)
eg: jmap -dump:format=b,file=test-dump.hprof [PID]

3. Above sample codes are just for understanding the concept. 

[1] https://docs.oracle.com/cd/E13150_01/jrockit_jvm/jrockit/geninfo/diagnos/garbage_collect.html


Edit:

Following are few other important flags that could be useful in generating heap dumps;

-XX:HeapDumpPath=/tmp/heaps
-XX:OnOutOfMemoryError="kill -9 %p" : with this you can execute command at the JVM exit
-XX:+ExitOnOutOfMemoryError : When you enable this option, the JVM exits on the first occurrence of an out-of-memory error. It can be used if you prefer restarting an instance of the JVM rather than handling out of memory errors [2].
-XX:+CrashOnOutOfMemoryError : CrashOnOutOfMemoryError - If this option is enabled, when an out-of-memory error occurs, the JVM crashes and produces text and binary crash files (if core files are enabled) [2].

[2] http://www.oracle.com/technetwork/java/javase/8u92-relnotes-2949471.html

Wednesday, December 23, 2015

The core of the next-generation WSO2 Carbon platform : WSO2 Carbon Kernel 5.0.0

A whole new revamp of the heart of all WSO2 products : WSO2 Carbon Kernel 5.0.0, was released 21 Dec 2015.

Previous versions of the WSO2 Carbon Kernel, (1.x.x to 4.x.x) had a much similar architecture and was tightly coupled with relatively old technologies (axiom, axis2, SOAP, etc.). Which is the same reason, which made us to re-think and re-architecture everything from the ground, and to come up with WSO2 Carbon Kernel 5.0.0.

The new Kernel is armed with the latest technologies and patterns. It will provide the key functionality for server developers on top of the underline OSGi runtime.

Key Features
  • Transport Management Framework
  • Logging Framework with Log4j 2.0 as the Backend
  • Carbon Startup Order Resolver
  • Dropins Support for OSGi Ready Bundles
  • Jar to Bundle Conversion Tool
  • Artifact Deployment Engine
  • Pluggable Runtime Support

You can download the product from [1], and find more information on [2].

[1] http://product-dist.wso2.com/products/carbon/5.0.0/wso2carbon-kernel-5.0.0.zip
[2] https://docs.wso2.com/display/Carbon500/WSO2+Carbon+Documentation

Friday, December 18, 2015

Logging with SLF4J

The Simple Logging Facade for Java (SLF4J) serves as a simple facade or abstraction for various logging frameworks. It allows you to code just depending on a one dependency namely "slf4j-api.jar", and to plug in the desire logging framework at runtime.

It is very simple to use slf4 logging in your application. You just need to create a slf4j logger and invoke its methods.

Following is a sample code,

package com.test;

import org.slf4j.Logger;
import org.slf4j.LoggerFactory;

public class Main {
    private static final Logger logger = LoggerFactory.getLogger(Main.class);

    public static void main(String[] args) {
        logger.info("Testing 123");
    }
}

You have to add the following dependency in your pom.xml file

<dependency>
    <groupId>org.slf4j</groupId>
    <artifactId>slf4j-api</artifactId>
    <version>1.7.13</version>
</dependency>

This is the bare minimum configuration you need to enable sl4fj logging. But if you run this code. you will get a warning similar to the below.

SLF4J: Failed to load class "org.slf4j.impl.StaticLoggerBinder".
SLF4J: Defaulting to no-operation (NOP) logger implementation
SLF4J: See http://www.slf4j.org/codes.html#StaticLoggerBinder for further details.

This is because, it can't find a binding in the class path, by default, if it can't find a binding in the class path, it will bind to no-op logger implementation.

Using java.util.logging

If you want to use the binding for java.util.logging in your code, you only need to add the following dependency in to your pom.file.

<dependency>
    <groupId>org.slf4j</groupId>
    <artifactId>slf4j-jdk14</artifactId>
    <version>1.7.13</version>
</dependency>

This will output the following,

INFO: Testing 123


Using Log4j

If you want to use the binding for log4j version 1.2 in your code, you only need to add the following dependency in to your pom.file.

<dependency>
    <groupId>org.slf4j</groupId>
    <artifactId>slf4j-log4j12</artifactId>
    <version>1.7.13</version>
</dependency>

Log4j needs an appender to log. Hence, you have to specify the log4j properties.

Create the file "log4j.properties", in resource directory of your project and add the following into it.

# Set root logger level to DEBUG and its only appender to A1.
log4j.rootLogger=DEBUG, A1

# A1 is set to be a ConsoleAppender.
log4j.appender.A1=org.apache.log4j.ConsoleAppender

# A1 uses PatternLayout.
log4j.appender.A1.layout=org.apache.log4j.PatternLayout
log4j.appender.A1.layout.ConversionPattern=%-4r [%t] %-5p %c %x - %m%n

This will output the following,


0    [main] INFO  com.test.Main  - Testing 123


[1] http://www.slf4j.org/
[2] http://logging.apache.org/log4j/1.2/index.html

WSO2GREG : Upload files

WSO2 Governance registry (WSO2GREG) is a metadata repository. It supports storing, cataloging, indexing, managing and governing your enterprise metadata related to any kind of asset.

Uploading files directly in to the GREG is not recommended. What is recommended is to upload the files in to a file server and use a link to the file as a metadata.

But there may be situations where you really need to keep the files in GREG itself. Let's see how you can do this in GREG.


1. Download the file.rxt file from [1].
2. Create a new artifact type from the WSO2GREG management console. Extensions-> Configure->Artifact Types->Add new Artifact
3. Download the "file" extension from [2]
4. Copy the "file" directory to "[GREG_HOME]/repository/deployment/server/jaggeryapps/publisher/extensions/assets/"

This will add a new item "file" in to the menu and you should be able to upload and download files in WSO2GREG.

If you need to make any association to "files" you upload here, you have to do the following to list the files in the associations view.

Let's assume you want link these files to "soapservice" artifact. Then do the following.

1. Edit the Association types for "soapservice" in [GREG_HOME]/repository/conf/governance.xml file to have the file details
<file>file</file>

Following is a sample configuration for Association type="soapservice", once you add the "file" type


<Association type="soapservice">
<security>policy</security>
<ownedBy>soapservice,restservice,wsdl</ownedBy>
<usedBy>soapservice,restservice,wsdl</usedBy>
<dependancies>soapservice,restservice,wsdl,endpoint</dependancies>
<file>file</file>
</Association>

[1] http://www.mediafire.com/view/dtog4qdrs1v0mw1/file.rxt
[2] http://www.mediafire.com/download/6df8eofni2tqtwr/file.zip


Sunday, December 13, 2015

WSO2GREG : Categorized view of your assests


Let's assume you have five services, namely, Service1, Service2, Service3, Service4 and Service5. If you just create these service in the WSO2GREG, all those services will be displayed as follows,


Sometime it is needed to group the assets based on some criteria. Let's say, Service1 and Service2 belongs to DepartmentA and Service3, Service4, Service5 belongs to DepartmentB.

If we need to have a categorized view based on the department. Follow the below mentioned steps.

1. Add the following filed to the "soapservice" artifact. You edit it via management console. Extensions->Configure->Artifact Types->soapservice->Edit


<field type="options">
  <name label="Category">Category</name>
  <values>
    <value>Department1</value>
    <value>Department2</value>
  </values>
</field>

2. Download the asset.js file in the following location and copy it to the following location [GREG_HOME]/repository/deployment/server/jaggeryapps/publisher/extensions/assets/soapservice (replace the existing asset.js file)

http://www.mediafire.com/view/ka31hd4q5eqt44u/asset.js

3. Restart the server

4. You can now see, a new dropdown got appear in front of the search box.


5. Go to each of those service and edit those service to have its corresponding department in the "Category" field.

6. You can now view and search on the selected category.


Friday, December 11, 2015

WSO2GREG Publisher and Store

New WSO2 Governance registry (WSO2GREG) comes with a brand new two applications

1. Governance Center : Publisher
2. Governance Center : Store

These two will be the main UIs to deal with the assets (assets governance), WSO2 will no longer encourage to use the management console for artifact management. (you can use the management console to setup assets, lifecycles, users, etc. but not for artifact management)

Governance Center : Publisher


Governance Center : Store


Wednesday, July 29, 2015

Binding a processes into CPUs in Ubuntu

In this post I'm going to show you how to bind a process into a particular CPU in Ubuntu. Usually the OS manages the processes and schedules the threads. There is no guarantee on which CPU your process is running, OS will schedule it based on the resource availability.

But there is a way to specify the CPU and bind your process into a CPU.

taskset -cp <CPU ID | CPU IDs> <Process ID>

Following is an sample to demonstrate how you can do that.

1. Sample code which consumes 100% CPU (for demo purposes)

class Test {
    public static void main(String args[]) {
        int i = 0;
        while (true) {
            i++;
        }
    }
}

2. Compile and run the above simple program

javac Test.java
java Test

3. Use the 'htop' to view the CPU usage

In the above screen shot you can see that my sample process is running in the CPU 2. But its not guaranteed that it will always remain in CPU2. The OS might assign it to another CPU at some point.

4.  Run the following command, it will assign the process 5982 permanently into 5th CPU (CPU # start at zero, hence the index 4 refers to 5th CPU.)

taskset -cp 4 5982


In the above screen shot you can see, that 100% CPU usage is now indicated in the CPU 5.

Monday, July 13, 2015

WSO2 BAM : How to change the scheduled time of a scripts in a toolbox

WSO2 Business Activity Monitor (WSO2BAM) [1] is a fully open source, complete solution for monitor/store a large amount of business related activities and understand business activities within SOA and Cloud deployments.

WSO2 BAM comes with predefined set of toolboxes.

A toolbox consist of several components
1. Stream definitions
2. Analytics scripts
3. Visualizations components

Non of the above 3 components are mandatory.
You can have a toolbox which has only Stream definitions and Analytics scripts but not Visualization components.

In WSO2 BAM, toolbox always get the precedence. Which means if you manually change anything related to any component published via a toolbox. It will be override once the server is restarted.

If you update,
1. Schedule time
This will update the schedule time, and newly update value will be only effective until the next restart. This will not get persisted. Once the server is started, schedule time will have the original value form the toolbox

2. Stream definition
If you change anything related to stream definition, it might cause some consistency issues. When the server is restarted, it will find that there is already a stream definition exist with the given name and the configurations are different. So an error will be logged.

So it is highly discouraged to manually modify the components deployed via a toolbox

The recommended way to change anything associated with a toolbox, is to,
1. Unzip the toolbox.
2. Make the necessary changes.
3. Create a zip the files again.
4. Rename the file as <toolbox_name>.tbox
5. Redeploy the toolbox

So, if you need to change the scheduled time of Service_Statistics_Monitoring Toolbox,
Get a copy of Service_Statistics_Monitoring.tbox file resides in [BAM_HOME]/repository/deployment/server/bam-toolbox directory.

Unzip the file. Open the file Service_Statistics_Monitoring/analytics/analyzers.properties

Set the following configuration according to your requirement
analyzers.scripts.script1.cron=0 0/20 * * * ?

Create a zip file and change the name of the file to Service_Statistics_Monitoring.tbox

And redeploy the toolbox.

Now your changes is embed into the toolbox and each time the toolbox is deployed, it will have the modified value.

[1] http://wso2.com/products/business-activity-monitor/

Tuesday, July 7, 2015

Publishing WSO2 APIM Statistics to WSO2 BAM

WSO2 API Manager (WSO2APIM) [1] is a fully open source, complete solution for creating, publishing and managing all aspects of an API and its lifecycle.

WSO2 Business Activity Monitor (WSO2BAM) [2] is a fully open source, complete solution for monitor/store a large amount of business related activities and understand business activities within SOA and Cloud deployments.

Users can use these two products together, which collectively gives total control over management and monitoring of APIs.

In this post I'm going to explain how APIM stat publishing and monitoring happens in WSO2APIM and WSO2BAM.

Configuring WSO2 APIM to publish statistics

You can find more information on setting up statistics publishing in [3]. Once you do your configurations, it should look like the below.

<APIM_HOME>/repository/conf/api-manager.xml

 1
 2
 3
 4
 5
 6
 7
 8
 9
10
11
12
<APIUsageTracking>
    <!-- Enable/Disable the API usage tracker. -->
    <Enabled>true</Enabled>   
    <PublisherClass>org.wso2.carbon.apimgt.usage.publisher.APIMgtUsageDataBridgeDataPublisher</PublisherClass>
    <ThriftPort>7614</ThriftPort> 
    <BAMServerURL>tcp://<BAM host IP>:7614/</BAMServerURL>
    <BAMUsername>admin</BAMUsername>
    <BAMPassword>admin</BAMPassword>
    <!-- JNDI name of the data source to be used for getting BAM statistics. This data source should
        be defined in the master-datasources.xml file in conf/datasources directory. -->
    <DataSourceName>jdbc/WSO2AM_STATS_DB</DataSourceName>
</APIUsageTracking>

<APIM_HOME>/repository/conf/datasources/master-datasources.xml


 1
 2
 3
 4
 5
 6
 7
 8
 9
10
11
12
13
14
15
16
17
18
19
20
<datasource>
    <name>WSO2AM_STATS_DB</name>
    <description>The datasource used for getting statistics to API Manager</description>
    <jndiConfig>
        <name>jdbc/WSO2AM_STATS_DB</name>
    </jndiConfig>
    <definition type="RDBMS">
        <configuration>
            <url>jdbc:mysql://localhost:3306/stats_db?autoReconnect=true&amp;</url>
            <username>db_username</username>
            <password>db_password</password>
            <driverClassName>com.mysql.jdbc.Driver</driverClassName>
            <maxActive>50</maxActive>
            <maxWait>60000</maxWait>
            <testOnBorrow>true</testOnBorrow>
            <validationQuery>SELECT 1</validationQuery>
            <validationInterval>30000</validationInterval>
         </configuration>
    </definition>
 </datasource>


Configuring WSO2 BAM


You can find more information on setting up statistics publishing in [3].

Note that you only need to copy API_Manager_Analytics.tbox into super tenant space. (No need to do any configuration in tenant space)


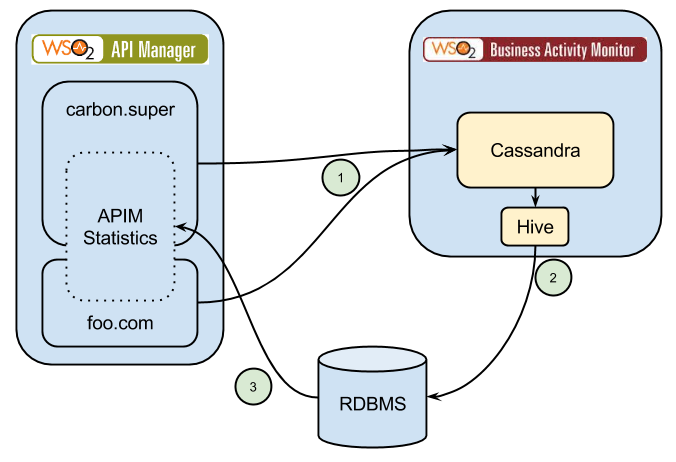
Above digram illustrate how the stat data is published and eventually view though the APIM Statistic view.

1. Statistics information about APIs from all the tenants are published to the WSO2 BAM via a single data publisher.

2.  API_Manager_Analytics.tbox has stream definitions and hive scripts needed to summarize statistics. These hive scripts get periodically executed and summarized data is pushed into a RDBMS.

3. When you visit statistics page in WSO2 APIM, it will retrieve summerized statistics form the RDBMS and shows it to you.

Note: If you need to view statistics of a API which is deployed in a particular tenant. Login in to WSO2 APIM in particular tenant and view statistics page.
(You don't need to do any additional configuration to support tenant specific statistics.)


[1] http://wso2.com/api-management/
[2] http://wso2.com/products/business-activity-monitor/
[3] https://docs.wso2.com/display/AM180/Publishing+API+Runtime+Statistics

Monday, April 6, 2015

Error occurred while applying patches {org.wso2.carbon.server.extensions.PatchInstaller}

I have seen people complaining that WSO2 servers logs the following error message at server start up.


 1
 2
 3
 4
 5
 6
 7
 8
 9
10
11
12
13
[2015-04-06 15:48:57,572] ERROR {org.wso2.carbon.server.extensions.PatchInstaller} -  Error occurred while applying patches
java.io.IOException: Destination '/home/jayanga/WSO2/wso2am-1.7.0/repository/components/plugins/org.eclipse.equinox.launcher.gtk.linux.x86_1.1.200.v20120522-1813' exists but is a directory
 at org.wso2.carbon.server.util.FileUtils.copyFile(FileUtils.java:145)
 at org.wso2.carbon.server.util.PatchUtils.copyNewPatches(PatchUtils.java:211)
 at org.wso2.carbon.server.extensions.PatchInstaller.perform(PatchInstaller.java:80)
 at org.wso2.carbon.server.Main.invokeExtensions(Main.java:152)
 at org.wso2.carbon.server.Main.main(Main.java:94)
 at sun.reflect.NativeMethodAccessorImpl.invoke0(Native Method)
 at sun.reflect.NativeMethodAccessorImpl.invoke(NativeMethodAccessorImpl.java:39)
 at sun.reflect.DelegatingMethodAccessorImpl.invoke(DelegatingMethodAccessorImpl.java:25)
 at java.lang.reflect.Method.invoke(Method.java:597)
 at org.wso2.carbon.bootstrap.Bootstrap.loadClass(Bootstrap.java:63)
 at org.wso2.carbon.bootstrap.Bootstrap.main(Bootstrap.java:45)


The main reason to see such error message is, some erroneous entries in the patch metadata files for files itself.

This might happen if you try to forcefully stop the server as soon as you start the server

When the server start up, it copies the patch files. If the server is forcefully stopped at that time using [ctrl+c], patching processes get immediately stopped and patch meta-data will get corrupted.

You can get rid of this issue by removing corrupted patch related meta-data manually and restating the server, so that the server will apply all the patches form the beginning.

  1. remove [CARBON_HOME]/repository/components/patches/.metadata
  2. restart the server. (do not interrupt while starting up)

Thursday, March 26, 2015

Everyday Git (Git commands you need in your everyday work)

Git [1] is one of the most popular version control systems. In this post I am going to show you how to work with GitHub [2]. When it comes to GitHub there are thousands of public repositories. If you are interested in a project you can start working on it and contributing it. Followings are the steps and commands you will have to use while you work with GitHub.

1. Forking a repository
This is done via the GithHub [2] web site.

2. Clone a new repository
git clone https://github.com/jsdjayanga/carbon4-kernel.git

3. Get updates from the remote repository (origin/master)
git pull origin master

4. Push the updates to the the remote repository (origin/master)
git push origin master

5. Add updated files to staging
git add TestFile.java

6. Commit the local changes to the remote repository
git commit -m "Modifications to TestFile.java" --signoff

7. Set the upstream repository
git remote add upstream https://github.com/wso2/carbon4-kernel.git

8. Fetch from upstream repository
git fetch upstream

9. Fetch from all the remote repositories
git fetch --all

10. Merge new changes from upstream repository for the master branch
git checkout master
git merge upstream/master

11. Merge new changes from upstream repository for the "otherbranch" branch
git checkout otherbranch
git merge upstream/otherbranch

12. View the history of commits
git log

13. If needed to discard some commits in the local repository
First find the commit ID to which you want to revert back to. The user the following command
git reset --hard #commitId

14. To tag a particular commit
git checkout #commitid
git tag -a v1.1.1 -m 'Tagging version v1.1.1'
git push origin --tags


[1] http://git-scm.com/
[2] https://github.com/

WSO2 Carbon : Get notified just after the server start and just before server shutdown

WSO2 Carbon [1] is a 100% open source, integrated and componentized middleware platform which enables you to develop your business and enterprise solutions rapidly. WSO2 Carbon is based on OSGi framework [2]. It inherits molecularity and dynamism from the OSGi.

In this post I am going to show you how to get notified, when the server is starting up and when the server is about to shut down. 

In OSGi, bundle start up sequence is random. So you can't rely on the bundle start up sequence.

There are real world scenarios where you have some dependencies amount bundles, hence need to perform some actions before other dependent bundles get deactivated in the server shutdown.

Eg. Let's say you have to send messages to a external system. Your message sending module use your authentication module to authenticate the request and send it to the external system and your message sending module try to send all the buffered messages before the server shutdown.

Bundle unloading sequence in OSGi not happened in a guaranteed sequence. So, what would happen if your authentication bundle get deactivated before your message sending bundle get deactivated. In this case message sending module can't send the messages

To help these type of scenarios WSO2 Carbon framework provide you with a special OSGi service which can be used to detect the server start up and server shutdown

1. How to get notified the server startup

Implement the interface org.wso2.carbon.core.ServerStartupObserver [3], and register it as a service via the bundle context.

When the server is starting you will receive notifications via completingServerStartup() and completedServerStartup()


2. How to get notified the server shutdown

Implement the interface org.wso2.carbon.core.ServerShutdownHandler [4], and register it as a service via the bundle context.

When the server is about to shutdown you will receive the notification via invoke()

eg:

1
2
3
4
5
6
7
protected void activate(ComponentContext componentContext) {
 try {
     componentContext.getBundleContext().registerService(ServerStartupObserver.class.getName(), new CustomServerStartupObserver(), null) ;
 } catch (Throwable e) {
     log.error("Failed to activate the bundle ", e);
 }
}


Sunday, October 5, 2014

How to register a custom deployer in Carbon

Deployers in Axis2 are used to track the new file additions, file updates and file deletes. Writing an custom deployer is not a difficult task. A deployer is an implementation of org.apache.axis2.deployment.Deployer interface. You can find more details on how to write a deployer on : http://wso2.com/library/3708/

Once you write your custom deployer, you have to register it. Following  is how to register a custom deployer.

Add the deployer details to the component.xml file

 1
 2
 3
 4
 5
 6
 7
 8
 9
10
11
<component xmlns="http://products.wso2.org/carbon">
   <deployers>
       <deployer>
           <directory>sample</directory>
           <extension>xml</extension>
           <class>
               org.wso2.carbon.samples.deployer.CustomDeployer
           </class>
       </deployer>
   </deployers>
</component>

As the information given in the above configuration, a directory named ‘sample’ in the location ‘repository/deployment/server’ will be monitored. Whenever file with extension ‘xml’  is added, modified or removed deployed() method will be called.

Add the following entry to the <configuration> <instructions> list of the maven-bundle-plugin in your pox.xml file.

<Axis2Deployer>CustomDeployer</Axis2Deployer>

To be responsive for real time file additions, updates and deletions configuration ‘hotupdate’ in Axis2.xml has to be set to true.

<parameter name="hotupdate" locked="false">true</parameter>

You can find a sample code in : https://github.com/jsdjayanga/How-to-register-a-custom-deployer-in-Carbon